Wednesday, February 27, 2013

How to Select Turkey Hunting Gear


Welcome back to Southern Roots, today we will be finishing up the last post in the turkey hunters guide.  This post will focus on what you’re going to need for heading out into the spring woods and where to get it.


To begin with let’s start out with the shot gun hunter. first things first you’re going to need a shot gun chambered for at least 3in shells, 3 1/2 in will allow you to shoot bigger shells for better range.  Your shot gun should have at least bead sights, red dots work wonders but aren’t necessary. Make sure your shot gun has a good butt pad, turkey shells are infamous for leaving some serious bruises and this can make recoil shy shooters flinch at the moment of truth.   


Another thing to consider is that turkeys have great eye sight, so camo guns are defiantly preferred. If you already have a gun that you want to use that doesn't have a camo pattern you can find all kinds of ways to camo the gun at most hunting outfitter; Cabelas, Bass pro shop etc.  However; if you decide not to camo your guns at least make sure you have a non-reflective paint on all the metal. Do not put this paint on yourself. The best way to do this if it doesn't come camo from the factory is to use camo wrap or get it professionally done.


 Now as for the all-important shot gun shell I’ve always had the most success with 12 gauge.  Although, with a good shell 20s can still do the job just fine.  If you do decide to go with the 20 gauge get a tight choke and use good shells like federal premium flight control wad.  You can get these shells almost anywhere (unless you’re having the same problem that we are down here in the south and no store can keep ammo on the shelf).  If you’re shooting a 12 gauge you don't have to be quite as particular you can get cheaper shells and chokes. A good idea is to  still get a turkey choke and practice at 40 yards and remember no amount of gear can make up for practice.


 Let’s step away from the gun safe for a second and talk about apparel yes I said clothes.  Starting at the top and working our way down.  First the  hat something to cover your head is a must,  next your face,  if you’re like me and you have a good ol farmers tan then you will want a mask or at least  face paint for sure you  wouldn't want the sun reflecting off that white face. This will   give you away.


 The next thing you will need to think about is if you want to use a vest or a pack.   Most turkey hunters you see choose a vest and with good reason everything you need is easy access and organized.  They are light breathable and often have cushions for sitting on.  As for me being a bow hunter, I hunt from a blind and find it just as easy to carry a pack.


 Now comes the part where we talk about those bushes you see on the TV shows with the turkey calls and the gun 3-D camo. This has become a symbol of turkey hunters and with good reason this type of camo is a huge innovation. While not completely necessary, you’ll find that you get busted a lot less if you invest in a good 3D suite, one that matches your area. Check the brand  Red Head for this product.


As for your feet, you want the boots you wear to be water proof.  Gore-Tex is great as far as water proof goes and light insulation.  If you’re in an area with lots of snakes, invest in a good pair of snake boots better safe than sorry or even dead.


 As for your hands, you will want to make sure that your hands are covered for the same reason as you cover your face.  So use light gloves sprayed down with bug spray if you don't spray you are in for a miserable hunt.   


Blinds are another aspect of turkey hunting gear, this one is optional but I love mine.  Like most things go you can spend as much or as little as you like but if you are bow hunting just make sure that you have room to draw back.   If you are looking for a high dollar blind I suggest double bull blinds by Primos. Also and hub blind by primos is a good buy.   If you go this route get a comfortable seat.  I’ve been known to carry a bucket and pillow into the woods; this will have your hunting buddies laughing as you come out of the woods with a long beard.  The reason I use a bucket is because there is no back rest to interfere with my draw and of course the pillow is self-explanatory.


 Let’s talk about the bow hunters out there, as I said in an earlier post just use the same set up you do for deer; 50lb draw weight is fine even less will work.  The only part about bow hunting birds that is really different is your broad heads.  Make sure you are using large blade expandable range; two or three blade turkey broad heads are the best for body shots. However; if you want to go after the head, gobbler guillotine is the only way to go.  All of these items can be bought at your local archery shop.  Remember to support small businesses but Bass Pro will also carry them.


 Well y'all spring is almost here time to check off the shopping list and get ready for another year.

Good Hunting and God Bless,

Ryan

Wednesday, February 20, 2013

decoy tactics


Turkey decoys have been used for years and have been deemed highly effective among turkey hunters. However decoys require hunters that use them to know the proper techniques. Hopefully this post will help every new turkey hunter understand how to properly use turkey decoys.

 There are quite a few different types of turkey decoys out there. I usually use the foam body collapsible variety.  They are easy to store in your hunting vest or pack they are light weight and fairly realistic. There are also hard bodied silhouette types which are basically just flat fabric stretched on stakes and painted like a turkey.  Moving decoys are becoming more and more popular these decoys work with either a jerk string or an electronic motor.  The advantage to moving decoys is that they give you that little bit of extra realism which can bring in that weary tom and give him confidence.  An extremely popular moving decoy is made by Primos and it’s called the killer B.

Now that you know a little about the types of decoys it’s time to talk about uses and strategies. I will also share with you some tricks that I’ve learned over the years.  One of the number one reasons hunters use decoys is to give an animal confidence, this rings true with turkey hunting as well.  for instance if you’re trying to call in a tom and he is responding to your calls but he just won’t come within range,  if he sees that decoy odds are he will come to investigate.  He will be ready to fight or breed.  The reason is that  he hears the call and he’s interested but then when he sees the decoy he is convinced this is not just a hunters set up but that this one is for  real. This is why decoys have become such a huge part of turkey hunting.

Set up and strategies

When setting up your decoys there are some things you should think about that will make you more successful.  Remember when that bird comes strutting in all of his attention will be focused on your decoys so do not put the decoys in a spot directly lined up with yourself. This step will insure that the sharp eyed gobbler won’t be looking right at you.  Using decoys as a focal point for the turkeys can be very effective but it can also get you in trouble.  An important   thing to remember is that if you choose to use a jake, (young male) decoy then be aware the best time to use this decoy is early season when the hierarchy is being established. This means that toms will be looking for a fight and will likely come to chase off the weak jake.  If you decide to use a jake decoy face him towards yourself toms will approach him from the front ready to fight, meaning you will be completely concealed. Here is something that can only be discovered through experimenting.  Some times when you have a tom that has seen decoys before and knows better than to come within range use this trick it will make it look like a hen and jake decoy are breeding. The tom will throw his better judgment out the window and come charging in.  This is most effective early season.  Another effective strategy is to set up between the moving tom and your decoys way you will not be seen but when using decoys.  Always remember if you set up the decoys out of your effective range then they do you no good so keep them close.

Too old to fight?

 Yes sometimes if a gobbler has some age on him 3 years or older he will not be much into fighting. What I am saying is that his all bark. In this case using a jake decoy can be like shooting yourself in the foot.  This gobbler will want nothing to do with getting his feathers kicked and just be on his way.

I hope this 3 part post has encouraged some of you great hunters to head into the spring woods for long beards this year.

Good hunting and God bless,

Ryan Lilly

Sunday, February 17, 2013

the art of calling


CALLS Part 2

Diaphragm (aka mouth calls) :

Mouth calls are a small piece of latex with any number of cuts in it or they could have no cuts at all. The material is stretched on a frame and covered in tape.  These calls are slightly more difficult to use compared to the friction calls. However, I definitely suggest you take the time to learn.  Mouth calls can be very effective when that sharp eyed gobbler is close and using a call that forces you to move or use your hands are out of the question.  The mouth call can also be extremely effective when used in corporation with a friction call making you sound like a harem of willing hens.  Once one has command of the mouth call he can change his cadence and pitch easily and make himself sound like the whole flock.


Technique:

 Place the call in your mouth, using your mouth place the call on your tongue and seal it to the roof of your mouth.   Use your tongue to place pressure on the latex, the more pressure you put on the latex reed the higher the pitch of the call will be.  Next, put your tongue on the reed and just force air between your tongue and the reeds to make a whistle sound.  Once you can make the whistle then say the word “puck” or “chuck this will cause the call to make a cluck ”. Once you have mastered this call blow on the reeds with a lot of pressure and then let off the pressure while continuing to blow air with your diaphragm this will make a whine . These are the first two calls I would suggest you master. these two calls can also be used when the gobblers head is down and you want him to look up to get that clean shot
Locator calls:

 Locator calls do exactly what the name suggests.  These calls can be anything from a wing bone call, gobbler shaker, crow calls, coyote calls, owl calls etc….   Let’s start with the most popular of these calls the crow and owl call.  These call are used to get birds to “shock gobble”, this is when an excited tom gobbles to any sound resembling the call of a hen.  The owl call can also be used the night before the hunt or if you get into the woods an hour or so before it gets light. By getting a bird to shock gobble from his bed room roost.  This can give you a great start to the hunt by allowing you to know just where to set up. 

Once you have located your bird and he is still in the tree this trick can also be effective.  While calling to the bird beat your hat on your leg this will sound like other turkeys taking flight out there roosting trees. This will encourage the smart tom to come down and join the other birds that he thinks are on the ground. You can also buy a real turkey wing with feathers on it for this task, sold by Primos.  However, I find using some rebel ingenuity works fine. You can also to use a rubber band around a bunch of turkey feathers that you’ve found to make one of the wing calls.


Two of the other Locator calls are the wing bone and the gobbler shaker; these two calls are very loud and useful to any turkey hunter. The wing bone is a Native American call that was once made from the hollow wing bone of a turkey.   Don’t worry if you’re not much of a call maker Primos also sells these calls.  These type of calls are loud enough to get that stubborn tom to gobble all the way across the property


Technique:

 Cup your hands around the large end of the call and place the tips of your lips on the smaller end. Next, suck in air while opening your cupped hands.  This will make the sound while use your hands to make the sound echo.


The gobbler shaker is a call meant to imitate the call of a male turkey.   This can be dangerous as I stated in the beginning of part one of this post turkey hunting is dangerous. The main reason is that other hunters may be in the woods this means you have to pay close attention when making the sound of the animal that others are hunting.  This call can be used as a locator call or to fire up that tom and make him ready to fight and when this call is paired with a hen call this can be a potent combination. I have had this trick work when all else fails.


Technique:

 Grab this call by the plastic end and shake. This one is pretty simple.  I suggest listening to a tom gobble to get some idea of how they sound then try to imitate it with this call.


I hope this post gave you spring fever because I know I have it!


Good hunting and God bless,

Ryan Lilly

Wednesday, February 13, 2013


The art of calling:

 This post will focus on using the proper techniques for calling in long beards while covering some of the basic types of turkey calls used in the spring woods. So get ready to grab your 12 gauge put on your snake boots and pop in a mouth call, lets go.

Basic types of calls:

I choose to start here because if you don't know what you’re looking for in a turkey call then there is a good chance you could end up purchasing the wrong one for yourself. I am starting with the 3 most basic types of calls the friction call, diaphragm or mouth call and the locator call. Each one of these calls has a place in the turkey hunter’s bag of tricks.  The most used call in the spring woods is the ever popular friction call.

As the name suggests friction calls work by using the power of friction. These calls come in 3 call types: the pot and peg, box call and the push pen. The most popular are the box and the pot and peg style calls.  My personal favorite is the pot and peg or slate call. The calls are operated by a wooden peg also known as a striker sliding across a surface such as glass, slate, aluminum or plexie type material.  Each surface material has its advantages and disadvantages; glass for example is very high pitched.  It is a call that will cut through strong winds easily.  The same goes for aluminum, this makes the first two calls great starting call and easy to use in any condition. Slate and plexi on the other hand are a little lower and quieter, making soft purrs and clucks perfect for imitating that provocative hen. if you are  confused and conflicted on what type of material you want to use then i suggest using the “quacker boy triple threat,” 1/3 of the call is glass and 1/3 is plexi , and 1/3 is aluminum,  this is a great call for those of you who just can’t make up their mind
Technique:The first thing you want to do is use the sand paper that comes with your call to cause abrasions on the surface of your call. This will allow the sound of calls to be made so it is imperative that you do not get the surface wet or to wipe it on clothing. Now let’s call, if you are using a pot and peg style call set the pot in your non dominant hand and the striker or peg in the other hand. Next, with your left hand make your fingers form a platform for the pot so that there is a pocket in your hand under the sound hole. At this point hold the striker in your right hand at a 45 degree angle and draw egg shaped ovals on the surface of the call.  Practice until you are comfortable.
                                            this tramp stamp by flextone is a great call and one
                                             of my favorite

Box calls and push pens:

Box calls and push pins like the pot and peg calls work on friction also. However they just have a slightly different design. Let’s began with the box call, a box call consist of a well, a box and a lid. When using the box call take the lid and slide it across the roughed lip of the box.  This causes the high pitched clucks, cuts and purrs. While not as loud as most glass and aluminum calls the box call does have advantages such as its one piece construction.  If you are one of those people who lose gear easily this is a huge advantage over the pot and peg style call. Another great advantage is the   ease of use.  The box call is probably the easiest call to learn. Although don’t let this stop you from trying other calls, a turkey hunter needs many types of calls to trick shy gobblers.  Also remember all birds are different and like different things remember this when call shopping.  Certain box calls have other ability’s for instance a wet box, this call does not need chalk and can work in wet conditions something most friction calls can’t do. The push pen calls operate by pushing a small wooden peg into a box which makes the call.   Like most friction calls its very simple to use and can also attach to the underside of a shot gun making it possible to do some calling while that gobbling, long beard is in your face and personal.

Technique scrapes the lid across the lip of the box to make the call


Don’t forget to check out the next post where we will continue to inform you about calls.

Good Hunting and God Bless,

Ryan

Thursday, January 31, 2013

Welcome to Stick & String Sunday


Stick and Sting Sunday, is the part of my blog where I will discuss bow hunting tips and tricks. Everything from learning to keep yourself sent free to perfecting your shooting form. This week where going to take a look at your bow grip and sight pictures.


Bow Grip

 Let’s begin with your bow grip, one thing that a lot of shooters, especially the younger ones tend to do is hold there bow too tightly.  This causes torque, which can destroy arrow flight and accuracy.  Too much torque has even been known to cause sting derailment which is a major problem. With today’s cams, the ones with shallow grooves derailment are far more prominent. One way a lot of shooters seek to combat torque is to shoot with an open hand grip.  However; this isn’t necessary or the best technique.  When you pull the trigger you instinctively grasp the handle of the bow, putting all kinds of bad torque on your bow.  Fortunately, there is a way to rid you of all unwanted torque.  The trick here is to wrap your fore finger and your thumb around your grip and just let the rest of your hand relax. Allow the grip to be pulled into the pocket of your hand between your thumb and first finger and this will keep the torque out of your form.

Model DS-5019

 Sight Picture and the Right Bow Sight

Your sight picture is what you see when looking through your peep and at your pins. A lot of people use the popular 3 of 5 pin sights, however; in the past 3 years I have fallen in love with the single pin adjustable sights. Imagine never having to put your target between your pins again. All you have to do is range the target, adjust the sight to the proper distance and let her fly.  Using a one pin sight has another distinct advantage.  No more bendy pins.  blendy pins is the effect when your fiber optic pins glare together and cause you to lose your target. This becomes a real problem especially at first and last light, which is conveniently the time when deer move the most.  So if you want to be the most effective shooter you can be by following these tips to perfect your form.

As always,

 Good Shooting and God Bless,

Ryan Lilly

Wednesday, January 30, 2013

Wiley Coyote


When the moon is full and the night is bright you can see them on the prowl.  If you’ve not seen them already they are probably on their way. These little beasts are coyotes and they are spreading like… well… varmints. There’s only one thing standing between them and total domination the North American hunter.


If coyote hunting is something you have never attempted you should consider giving it a try. This is part one of a two part post that will give you some insights and a good foundation for this side of huntingsport.


Healthier game population

Essentially, killing coyotes is a good way to work your way towards a healthier deer and turkey population. Stress is actually a determining factor for producing quality animals on any property.  Clearly toothy critters cause stress.


Spotlighting

 The government has begun to see issues with these wild dogs in many southern areas. Hunting with spotlights at night is an action that has not been allowed in previous years.  However;

Due to the over-population the rules have started to change .If you want to try your luck at spotlighting check your states rules and regulations before you purchase a spot light.


Baiting.

Most of the time coyotes are scavengers. Unfortunately this doesn’t mean they won’t slaughter and eat a helpless fawn or an injured mature deer.  Typically, they won’t kill for their own food. Knowing this fact gives you a leg up because you can use baits in your hunting strategy. One technique that I find works well is meat or gut pops.  Check out the next post and I will give you my special recipes for meat pops.


Part 2   Coyote Hunting


In order to create meat pops you need to start with a 5 gallon bucket and a deer carcass.   This can be a deer that you or someone else has killed.  I’ve even heard of people taking deer off the road to use for this.  Now for the messy part…Once you have the deer put the guts and blood into your 5 gallon bucket. I like to add some water to the mix just to make it easier to work with. Once I have it mixed I hang the meat/gut pop over a limb right at coyote level.  How long I leave it there before I began my hunt depends on the weather and temperature. However; this is just one way of doing things. I also hunt cow farms and if the owner has had a cow die then I will set up over that providing it’s in a good area. Of course just having any old carouse lying around near your hunting area will help, just remember there is always  the possibility that all the bait will be gone by the time you get out to hunt.


Calling and decoys.

Calling can also be an effective way to bring in the yotes.  I prefer the electronic calls like the Johnny Stewart.  The Stewart call is an an average call that won’t break the bank.  It has good sound and range. Next is to decide which sounds works best for you this will take some trial and error. This can be different in every location.  The sound of the jack rabbit and cotton tail often work well. A great way to tell if your using the right sound is see how other critters react to the calling especially predators.


Decoys….One thing I have never seen in a Bass pro or any other hunting establishment is a coyote decoy.  I have discovered that there is nothing wrong with a little bit of southern ingenuity. One of my favorites is to staple a turkey fan or even just a single feather to a 2 by 4 board and stand it up in a field near my meat pops.  This technique also works well with squirrel tails.


Guns… guns… guns. As far as guns go it doesn’t take much to drop a song dog, (coyote).  My favorites are the 223,243 and even 22s. However; I also like to carry a secret weapon my old reliable 12 gauge.

 For the most part any one coyote hunting will be using scopes although; this brings up one major disadvantage close distance shots. If that coyote has been sneaking up on you and he gets close before you realize it the last thing you want to do is have to aim through a scope.  That is where the 12 gauge will come in mighty handy along with some buckshot.  I’ll admit I’ve never had to go to this tactic but consider it a security blanket. If night hunting is your thing you will definitely want to get a light on that shotgun, even if you have to duct tape it on there.


Well, boys and girls I hope you find this helpful Hit the woods and give it a try.


 Good hunting and God bless

Ryan Lilly


chasing thunder chickens


Spring is in the air and the birds are chirping. Clear skies are overhead and it is time to  break out the 12 gauge in pursuit of the thunder chickens, (aka turkeys).


 This  blog post will be separated into 4 different sections: the art of calling, gear selection, general information and techniques, and decoy strategy .


 I’d like to start this first section off by saying if you’re a new hunter heading into the spring woods for your first turkey hunt there are two words you will live and die by...

bug spray… Keep in mind this isn't like deer hunting where scent free is a must. Protection is the key work here; a turkey will never bust you with its nose.  It’s those beady little eyes that you need to worry about.


 First let’s talk about camouflage. Down to your gun or bow and of course what you wear. Although, any pro turkey hunter you see on the outdoor Chanel will no doubt look like a bush, this is not a must. I know this because the first two turkeys I killed while wearing my deer hunting cover-alls and using a house protection shotgun. I know, don’t laugh I thought it was perfect until I realized that 3D gear defiantly makes a world of difference.  That’s when I joined all the other bushes out there in our quest for long beards.  Keep in mind that any bare skin will flash in the sun light and so will your gun. You will want to keep them covered.


 For all of you who have yet to take the “hunter’s education class” first of all, sign up now, but in case you don't take my advice remember Turkey is considered the most dangerous North American game to hunt. This is not because a love struck tom can get mighty upset when he finds out that the hen turkey he’s been talking to is just a bunch of foam. Remember you are imitating the animals that other hunters are chasing. Others may not choose their targets as well as you and me. With this said if not careful you could end up with a decoy that has a bad case of lead poisoning or worse yet, your leg, so avoid the colors red and bronze and even the ever so fashionable black.  


Enough about fashion, let’s talk guns, ammo and broad heads.  if you’re like me and nothing gets your blood pumping harder than hunting with stick and string, here are some tips: first of all your deer hunting draw weight is about perfect for turkeys but you will want to change your broad heads.  A large diameter expandable is the way to go.  Don’t use fixed blades the rage 2 blade mechanicals work well.  


When most turkeys are shot with an arrow they tend to either run or fly for a short distance so mark the spot you last saw the bird mentally. This will create a good recovery. When choosing a  gun, a 12 gauge with at least a 3in. chamber is a must, 3 1/2 is even better.  Pick a turkey choke compatible with your gun ask your pro shop what they suggest with regards to chokes. Red dot sights are nice but not necessary. The old beads are still taking birds no problem. When a turkey is shot it’s like killing a chicken, it will flop and roll.   You don’t want to shoot a second shot and risk losing meat or destroying feathers. If necessary, it is best to pick the bird up by its feet or ring its neck.


If you decide to put this information to  use this spring  it will serve you well!


 Good hunting and God bless,


Ryan Lilly


Saturday, January 26, 2013

Guide to Trail Cameras


.As our equipment evolves so do we, in our quest to be more proficient hunters.  One evolution that has come about in recent years is the trail camera. When the season is over and you are beginning your own hibernation, resting up from another hard year the trail camera is still hard at work.   In the field these little troopers are always out scouting around the clock and making our jobs just a little bit easier.  Now, no doubt as hunters our job does include scouting and most of us, me included enjoy taking to the field if even just to scout.  However; let’s face it no one can be out there all the time so game cams just make sense. 


Tip #1 Take one cam off the beaten path to get pictures of that camera shy buck:   The first thing a lot of people will do when trying to set a camera location is set up near game sign. However;  if you want to see the bruisers that cruise the brush that no weekend adventurer wants to tread follow this tip.   Put on your high boots and get ready to go through some gnarly cover. Big deer are creatures of solitude for the most part and want to be secluded. Of course, during the rut this all goes out the window, but for the most part this is true. 


Tip # 2 Master the art of using funnels:  Place your trail camera near funnels.  Rivers, fences any type of barricades that will push deer in a certain direction are very useful. Remember deer are lazy and will most often take the path of least resistance. A fence with a missing beam that makes it easier to jump, or  a fence with a missing strand of barbed wire making it possible for  a deer to slide under it  also help to create that funnel.  You can make these modifications yourself, however:  if it’s not your land check with the owner.


Tip #3  Don't be afraid to get the camera close to the trail:   As long as there’s no audible noise or flash (however if its an info red camera you wont have to worry about visible flash) coming from your camera when taking the picture close is good.   Remember it’s better to have that camera in the deer’s face than to have it so far away that you are unable to make out the pictures.


Tip # 4  The best way to view  the pictures is by using a picture viewer.
Although, a picture viewer is not the only way. If you don't want to invest in an expensive viewer, just purchase an economical digital camera that accepts the same type of SD card as your trail cam. You can check your pictures in the field using this and delete the unwanted ones. It is also a good idea to always bring another card along, this way you can switch out the SD card and bring your pictures back with you.


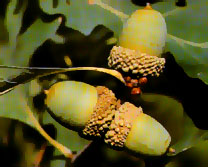
  Tip # 5 Baiting is never a bad idea   (where it’s legal and if it’s not, then well it’s a very bad idea).   If baiting is not allowed, then go to the next best thing; find out what your deer like to eat by research and experimenting. Then get your trail cam close to this food source for some great snap shots, as far as deer browse goes acorns are the old standby and make for some good results.


Good hunting and God bless,
Ryan Lilly


White oak acorns are preferred like the ones pictured here,  reds work well also just not as well


Tuesday, January 22, 2013

Striking "pher" since 2011 the Mcpherson series gets uncaged


For 2011, the Monster MR7 bow is a true beast.   It has evolved with all the advantages of its predecessors while doing away with some of the bugs often associated with dual cams. Much of this is due to revolutionary AVS cam technology. This new take on duel cams assures perfect cam timing.


 Another nice thing about this bow is the more forgiving 7 inch brace height. Every shooter has heard the term, “dead in hand,” this bow truly is.  There is no vibration whatsoever; making this the most comfortable speed bow you’ll ever shoot.  One thing all Mathews bow have in common is their harmonic dampeners and stabilizers. This is one of the traits that separate Mathews from the competition. The Monster bow can now be customized to show your own personal colors.


 The monster 7 brings another very useful accessory to the table that the monsters before it lacked. The dead end string stop is a vibration dampening break through and also works to silence the already stealthy quite bow    


 While Mathews will no doubt keep putting out new amazing bows like the Monster Chill or the Creed nothing is wrong with a rewind to get your hands on a 2011 MR 7, this power house brings explosive speed tack driving accuracy and one heck of a recipe for a successful season.

 Hope this review was helpful


Good hunting and God bless!


 Ryan Lilly